qntm Renderer/Raytracer
About this project
During my time at university, I took a computer graphics class. The main objective of the class was to create a 3D rendering engine with raytracing. A lot of the boilerplate groundwork was already done so that the we could focus on the actual computer graphics concepts. We had to implement cameras, integrators, BSDFs, lights, shapes, BVHs, and more.
There were also some bonus tasks that weren't mandatory, such as ray marching, that I decided to complete, because I wanted to learn more about computer graphics and also challenge myself. It's also important to mention that we have full permission to share our renderer publicly.
Technical details
The renderer is fully written in C++. It generates .exr images, which are high dynamic range images. Our first task involved programming a simple camera and some shapes to be rendered. A bonus task was also to implement a thin lense camera. This is what that looks like:
And here is some of the code for the thinlens camera:
Vector p_x = s_x * normalized.x() * m_fov_scale;
Vector p_y = s_y * normalized.y() * m_fov_scale;
Point2 jitteredPoint = createPointOnCircle(m_aperture_size);
jitteredPoint = Point(jitteredPoint.x() * m_aperture_size, jitteredPoint.y() * m_aperture_size, 0.f);
Ray ray = Ray(Vector(0), (Vector(0.f, 0.f, 1.f) + p_x + p_y).normalized());
float ft = m_focal_distance / ray.direction.z();
Point focal_point = ray(ft);
ray.origin = Point(jitteredPoint.x(), jitteredPoint.y(), 0.f);
ray.direction = (focal_point - ray.origin).normalized();
return CameraSample { .ray = m_transform->apply(ray), .weight = Color(1.f) };
}
As the code for the sphere intersections is relatively standard and can be found quite easily online, I'm omitting it here.
Next up, we can take a look at two of my integrators. These are responsible for actually calculating the color of a pixel. The first one is a simple normal vector integrator, which is also used in the example above. When the camera ray hits a target, it uses the normal vector of the hit point to color in the pixel.
Intersection its = m_scene->intersect(ray, rng);
Vector normal = its ? its.frame.normal : Vector(0.f);
return Color(normal);
}
The second integrator is a ray marcher. The concept here is that instead of calculating the intersection of a ray with a shape, we calculate the distance to the closest object in the scene. We then know that we can move at least that far without hitting anything, so we move the ray that distance and repeat the process. A common shape represented using this method is the Mandelbulb. As this was an optional task, there was basically no guidance given, so the following is entirely my own creation. This is what that looks like:
const float Epsilon = 0.001f;
Ray mutable_ray = ray;
Point o = mutable_ray.origin;
ref<Shape> target = nullptr;
float t = m_scene->distance(o, target);
float minimun_distance = Infinity;
for (int i = 0; i < m_max_iterations; i++) {
if (t < Epsilon) {
return Color(0);
}
else if (t > 10) { // This is fine for the small scenes I typically generate
if (minimun_distance < target.get()->getHaloRadius()) {
return target.get()->evaluateHalo(minimun_distance, i);
}
return m_scene->evaluateBackground(changingRay.direction).value;
}
changingRay.direction = (changingRay.direction + t * m_scene->lensing(o)).normalized();
o += t * changingRay.direction;
if (t < minimun_distance) {
minimun_distance = t;
t = m_scene->distance(o, target);
}
return Color(0);
}
You might've noticed two features here that I haven't mentioned before and that seperated this ray marcher from a typical one. The first is the halo effect, which is just some color we can add around any object by checking the minimum distance at which we missed that object. Each object can have it's own halo color and radius. That looks like this:
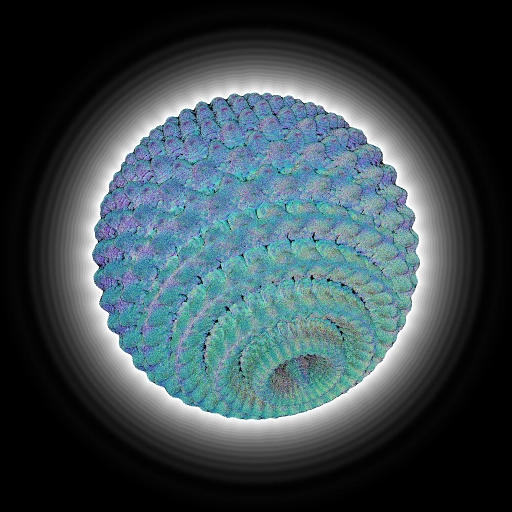
The second feature is gravitational lensing. This is a concept from astrophysics, where light is bent by the gravity of massive objects. We can implement this by adjusting the direction of the ray at each step by a lensing amount given by the scene. This allows us to create some cool effects, such as this black hole:
And finally, I'd like to show off the final pathtracer that I created for the class. It uses a BVH for fast intersection tests and a direct light integrator with next event estimation. The results look like this:
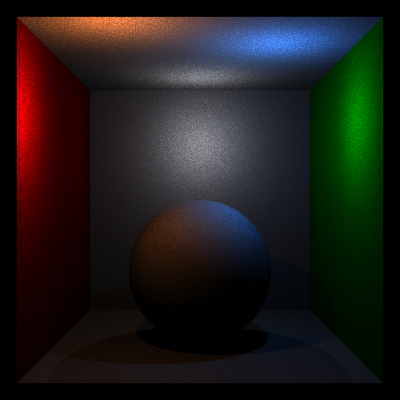
No pathtracing

Pathtracing
The images are still quite noisy because the renderer is CPU-based and getting rid of the noise would take a very long time. I think the main goals are still visibly quite nicely though.
And here's the code for the pathtracer:
if (!m_scene->hasLights())
return Color(0);
const LightSample LightSample = m_scene->sampleLights(rng);
const Light* light = lightSample.light;
if (!light->canBeIntersected()) {
const DirectLightSample dirLightSample = lightSample.light->sampleDirect(its.position, rng);
const Ray shadowRay(its.position, dirLightSample.wi);
if (!m_scene->intersect(shadowRay, DirectLightSample.distance, rng)) {
return its.evaluateBsdf(dirLightSample.wi.normalized()).value * dirLightSample.weight / lightSample.probability;
}
}
return Color(0);
}
Color Li(const Ray &ray, Sampler &rng) override {
Ray nextRay = ray;
Intersection its = m_scene->intersect(nextRay, rng);
if (!its || ray.depth > m_maxDepth) {
return m_scene->evaluateBackground(ray.direction).value;
}
BsdfSample sample = its.sampleBsdf(rng);
Ray bounce(its.position, sample.wi, ray.depth + 1);
nextRay = bounce.normalized();
return its.evaluateEmission() + nextEventEstimation(its, rng) + sample.weight * Li(nextRay, rng);
}